
- Preparation:
- Set out area size of the shed
- Use pegs and string to set out the area, using a level for the string
- Dig out the area 15-20 cm below ground level.
- Using treated timber, build a frame slightly larger than the shed’s dimensions.
- Measure diagonally to give true rectangle and use a spirit level to ensure timber is flat.
- Install the Sub-Base:
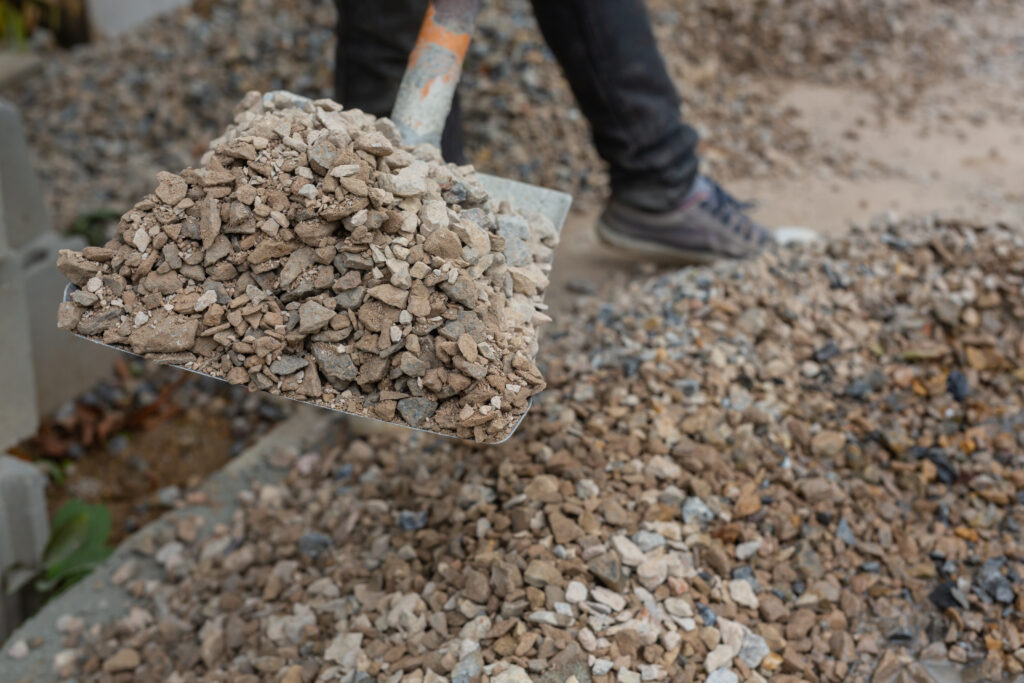
- Use MOT Type 1 granular material for the sub-base, compacted with a plate compactor or builders rammer.
- Compact until the material no longer compresses and creates a flat, solid surface.
- Mixing and Laying Concrete:
- Use a cement mixer for efficiency; a 4:1 mix of ballast (sand and stones) and cement is ideal.
- Add water gradually to achieve the right consistency, avoiding it being too dry or too runny.
- Spread and flatten the concrete using a long piece of timber in a sawing motion.
- Finishing Touches:
- Pour slightly more concrete than the frame height to avoid low spots but not too much to hinder leveling.
- Cover the concrete with a tarp if working in hot, sunny conditions to prevent cracking due to rapid evaporation.
- Allow at least two days for the concrete to cure before walking on it or constructing the shed.
Materials and Equipment Needed:
- Treated timber for the frame
- MOT Type 1 sub-base material (jumbo bags)
- Concrete ballast (sand and stones) and cement
- Plastic buckets for measuring
- Cement mixer (available for hire)
- Plate compactor, rammer, or wacker plate
- Wheelbarrow, spade, and long timber for spreading and leveling
- Tarpaulin (for covering concrete in hot weather)
Tips and Tricks:
- Accurate measurements and leveling during frame setup are crucial to avoid misalignment or uneven bases.
- Mix concrete in small, manageable batches and transport using a wheelbarrow.
- Flattening the concrete is labor-intensive but essential for a strong, level base.
- Complete the entire base in one day to ensure a cohesive slab.
.
How to Prepare the Site for Your Concrete Shed
Preparing the site for your concrete shed is crucial for ensuring a solid foundation. Begin by selecting a level area free from soft ground or debris. Use wooden pegs to outline the dimensions of your shed, making adjustments as necessary. Once you have the site marked, it’s important to excavate the area to a depth of at least 100mm to accommodate your concrete base for your shed. If you are building a larger shed, consider going deeper, up to 150mm, for added stability.
Next, you will need to build a concrete base. Start by preparing a concrete mix that is suitable for your project, ensuring it contains the right proportion of part cement and aggregates. Once mixed, you can pour a layer of concrete into the excavated area, ensuring it is evenly distributed. This layer of concrete will act as a solid base for your shed. Allow the wet concrete to cure properly, paying attention to the key moments outlined in your guide to laying concrete, especially during step 4.
After the concrete has set, you can proceed to lay a concrete base for your shed. A concrete shed slab will provide a durable foundation, whether you are installing a plastic shed or a more traditional timber structure. Once the base is ready, you can build your shed on top, ensuring it is level and secure. Following these steps will ensure your garden building stands strong for years to come, and you can find many helpful videos on the world on youtube for additional guidance.
Choosing the Right Materials for Your Concrete Base
Choosing the Right Materials for Your Concrete Base is essential for building a foundation for your shed or garden shed. Start by determining the dimensions of your base and decide how much concrete you need. To ensure a strong base, aim for at least 75mm of concrete. When you lay the concrete, use treated timber to create a frame that is flush with the top of the concrete pad. This will help keep the shed firm and level.
While building the shed, make sure the corners are square by using a method to measure the diagonal. If you need a larger base, consider making it wider and longer, ensuring it’s longer than the shed itself. Once the concrete in place, allow the concrete base to set properly. After it has cured, remove excess concrete around the shed, and ensure the base is on a solid surface rather than onto soft ground. This will provide a reliable support for your timber frame.
Step-by-Step Instructions for Laying a Concrete Slab
Before you begin, ensure you have the necessary planning permission for the shed that’s to be built. First, you’ll need to lay a raised polythene sheet on the ground to act as a moisture barrier. Next, constructing the frame for the concrete foundation involves positioning the wooden frame in a square to make sure it’s aligned correctly. Once the frame is set, you’ll need to calculate the amount of concrete you’ll need based on the size of the slab. A common mix is one part cement to five parts ballast. Prepare the mixture by combining the necessary concrete required for the job.
Now, you’re ready to pouring concrete into the frame. Start by pouring the concrete into the center of the frame and work your way outwards to ensure an even distribution. As the concrete starts to fill the frame, use a trowel to smooth the top of the frame and eliminate any air pockets. Allow the concrete while it sets for at least 24-48 hours to achieve solid concrete. After the slab has cured, you’ll have a strong base for your types of shed, whether it’s for storage or a workshop, providing a durable foundation for the walls or fencing you plan to add.
What Are Common Mistakes to Avoid When Building a Shed Base?
When you’re building a shed, one of the most critical aspects to consider is the shed foundation. A common mistake is neglecting to properly prepare the ground before you start. Ensure the area is level and compacted to prevent future settling. Additionally, when using concrete, it’s essential to create a form that will contain the concrete effectively. This will help you achieve a solid and stable base. Failing to do so can lead to an uneven shed floor, which can compromise the entire structure.
Another mistake is not paying attention to the height of the base. The base needs to be above ground level to avoid moisture issues. When pouring a concrete base that’s too low, water can seep in, causing damage to your shed over time. After pouring the concrete, ensure you allow it to cure properly before proceeding. Once the base is set, it’s crucial to position the frame accurately on top of it. A misaligned frame can lead to structural issues down the line.
Before you finalize the installation, always check the frame for level and square. This step is often overlooked but is essential for ensuring the longevity of your shed. Additionally, if you’re installing floor joists, make sure they are adequately supported by the foundation. By avoiding these common mistakes, you can create a sturdy and durable foundation for your shed that will stand the test of time.